Create Multiple-Component Classes: Limited-to-One Type
Reminder: How to Create Multi-Component Classes
See Create Multiple-Component Courses: Overview for a broad overview on how to create multi-component courses. Multi-Component classes can be created and maintained under Main Menu > Curriculum Management > Maintain Schedule of Classes. Sections can be more easily viewed in their entirety, however, using Main Menu > Curriculum Management > Update Sections of a Class, whereas Maintain Schedule of Classes is the optimal location for making changes.
Note: The functionality provided in the Update Sections of a Class area is handy for getting an at-a-glance view of class sections. It can help you visualize groupings, and you can also use it to make quick updates to certain field values, particularly enrollment capacities. Associated class value updates are best made in Maintain Schedule of Classes.
Creating a Limited Options-to-One Multiple-Component Class
The Limited Options-to-One grouping type indicates that the components of the class are both/all required. However, the student chooses an iteration of a component first and then must take the associated component.
The questions you ask yourself are answered in the following manner for the limited options-to-one configuration:
- What are the required components of the class? Both are required.
- In which component should students to enroll? A lab component.
- Will the grouping type require a change to the Associated Class number if the group comprises multiple enrollment sections? Yes.
- In what section do students need to be automatically enrolled? After a student chooses a lab component, the student is automatically enrolled in the lecture component.
To create this configuration, you alter values in the Class Type, Assoc, and Auto Enrl 1 columns.
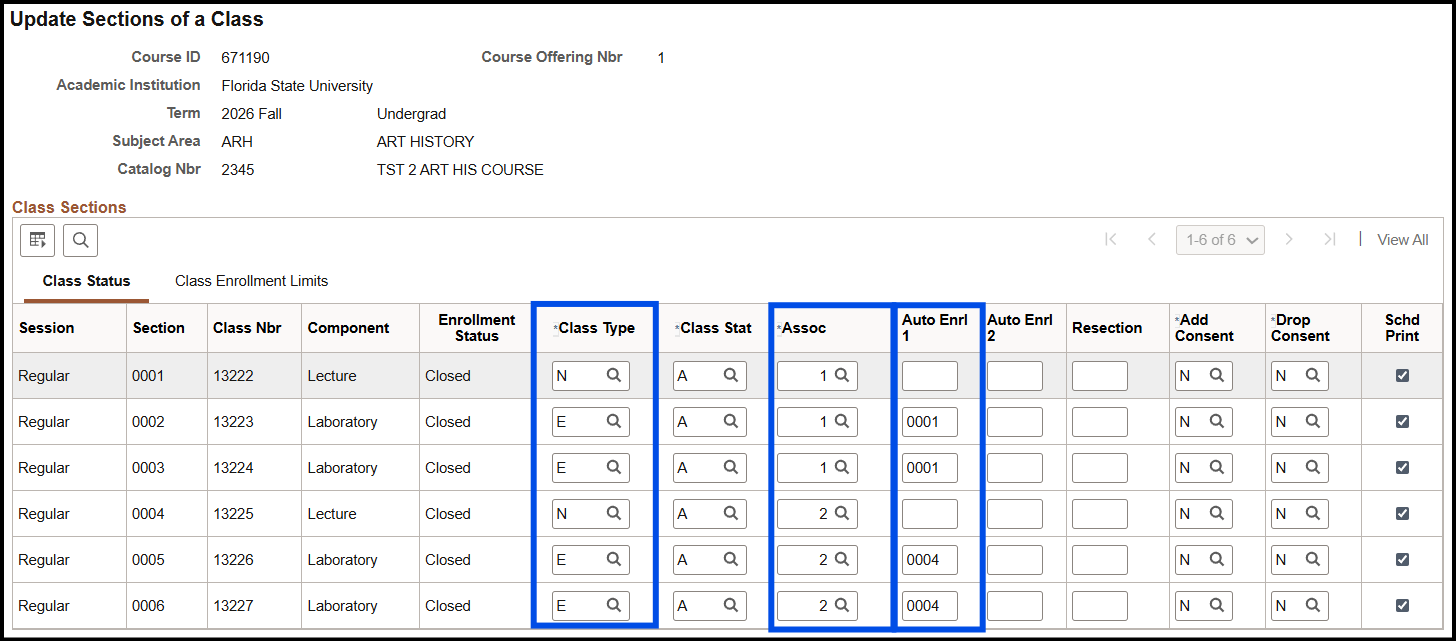
In the image above, students who enroll in one of two lab sections-0002 or 0003 are automatically enrolled in the associated 0001 section lecture. Students who enroll in one of two lab sections-0005 or 0006 are automatically enrolled in the associated 0004 section lecture.
1. On the Class Status tab, determine which class sections are being grouped in the one-to-limited options configuration.
2. In this example, students enroll in a lab component. Thus, if you did not designate the Class Type when you created the class section, change the value to E (Enroll) in the associated Class Type field for the lab sections you want open for enrollment.
3. Choose the lecture section to associate with these labs. For that lecture section, ensure that the Assoc field values are all equivalent. For example, if it's the first two lab sections to which you're associating a lecture, allow the value to remain 1 for both the labs and the associated lecture.
4. Choose the lecture section you want to associate with these labs. In the appropriate lab rows, type the lecture's Section number in the Auto Enrl 1 field.
5. Determine the next lab sections for which to create a limited options-to-one configuration.
6. Change the value to E (Enroll) in the associated Class Type field for the lab sections open for enrollment.
7. Choose the lecture sections to associate with these labs. For those lecture sections, ensure that the Assoc field values are all equivalent. For example, if it's the fifth and sixth lab sections to which you're associating a lecture, allow the value to remain 2 for both the labs and the associated lecture.
8. Choose the lecture section to associate with these labs. In the appropriate lab rows, type the lecture's Section number in the Auto Enrl 1 field.
9. Click Save.